How to Install and Run Android Apps on Windows 11 – Step by Step Guide
Here’s how to install android apps on Windows 11 and run them with ease. Follow the step-by-step guide for precision.
Microsoft recently rolled out the latest Windows 11 for the users. You can now download Windows 11 or update to the latest version of the operating system. As you may already know, the brand decided to introduce an option to run Android apps on Windows 11, without the help of an emulator.
This feature will ease up your work to a great extent and provide feasibility. The present version of Windows 11 does not include this feature and is soon to be rolled out in the upcoming ones. However, if you are a Windows Insider, you can use the beta test to run android APK on Windows 11.
The number of apps you can install on Windows 11 Beta is limited to 50 for now. This number will gradually increase with every update. All this is possible with the help of the Windows Subsystem for Android (WSA) with Amazon Appstore and Android Debugging Bridge. These utilities will help you install android apps on PC and run them with ease.
So, to help you further, we are providing this step-by-step guide to answer how to install android apps in Windows 11. If you are a beta test subject, you can take the help of these methods to run the apps on your system for free.
But before we go over the methods, let’s have a look at the minimum system requirements to run the apps.
Minimum System Requirements to Run Apps on Windows 11
Here are the basic system requirements necessary to run Android apps on Windows 11.
- Memory- 8GB or Higher
- Processor- Qualcomm Snapdragon 8c, AMD Ryzen 3000, Intel Core i3 8th Gen, or Higher.
Before you install android on PC you can check the Memory and Processor specifications on Windows 11 with the help of the following steps: Click on Start, Open Settings, then select the System subhead and click on About.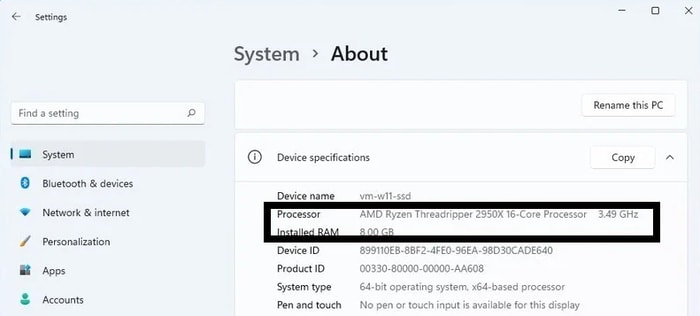
- Storage- Solid State Drive (SSD)
Follow these instructions to check whether you have an SSD or not: Click on Start, Open Settings, then select the System subhead, click on Storage, expand Advanced storage settings to find Disk and Volumes, and see the disk type.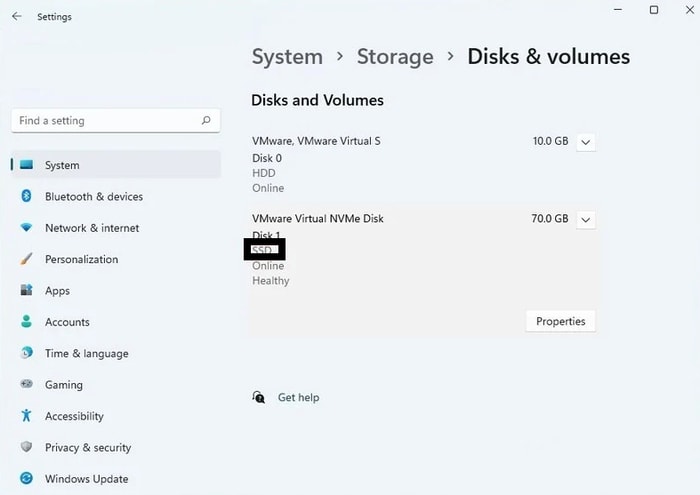
- MS Store- Version 22110.1402.6.0 or higher
For the ease of running android apps on PC, follow these instructions to get the latest version of the Microsoft Store: Open MS Store, click on Library, and select Get Updates.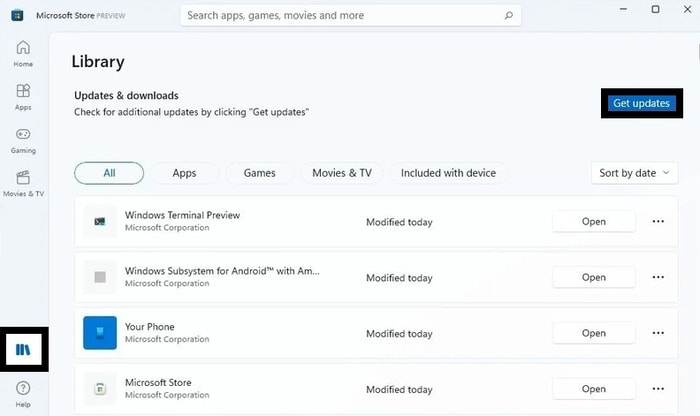
- Windows 11 OS– Beta Required
Follow these steps to join the Windows 11 Beta program. Navigate to Windows 11 Settings, click on Windows Update, select Windows Insider, click on Get Started, Link an Account, and follow the instructions to join the program. After that turn on the Beta Channel (you can also try Dev Channel).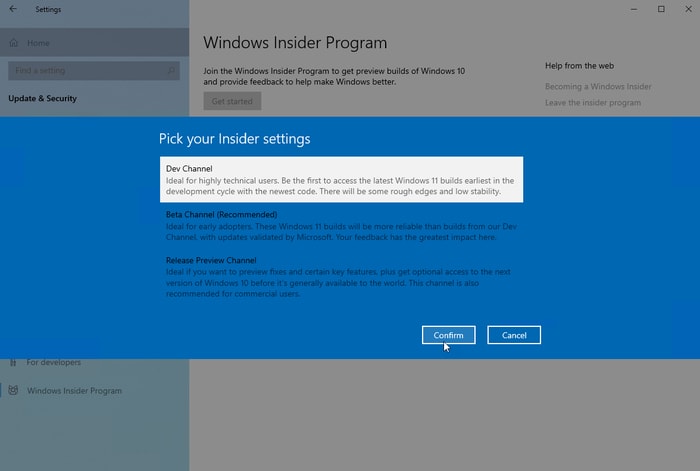
- Minimum OS Build- 22000.282 or higher
If you are wondering how to install android apps, then you need an updated OS to proceed. Search for “winver” and check whether your system has at least Build 22000.282 or not. If not, go to the Windows Settings, click on Windows Update, and refresh the page for system updates. Click on the update button to update Windows 11 to its latest version.
- Virtualization- Enabled
Press Ctrl+Shift+Esc keys, switch over to the Performance subtab and check if the Virtualization is Enabled. If disabled, click on Start, type Turn Windows features on or off, check the Virtual Machine Platform option, and press Ok. Restart the system to run Android APK on Windows 11.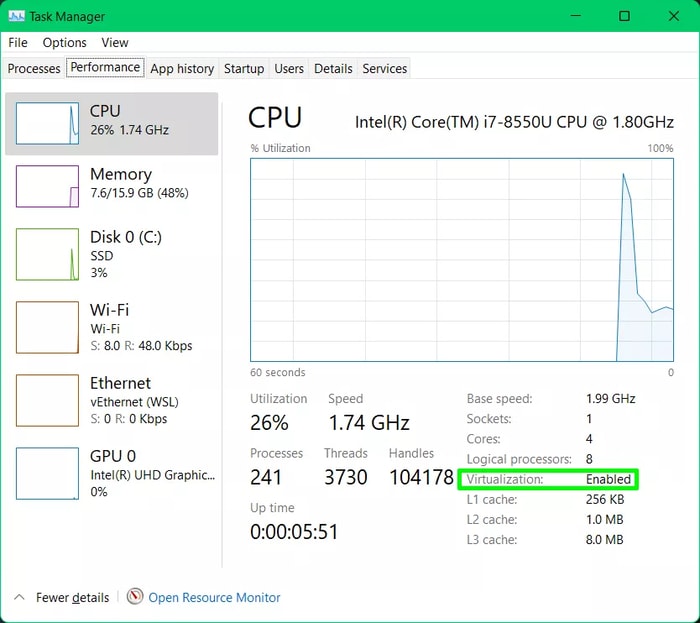
If your system meets all these requirements, proceed further with the installation.
Also Read: How to Install Apple Music on Windows 11 PC – Step by Step Guide
Step By Step Procedure to Install Android Apps on Windows 11 PC
If you are wondering how to install android apps on Windows 11 then follow the easy steps provided below and get the job done perfectly.
1. Download and Install Android on PC with Amazon Appstore
As you may already know, Microsoft announced that Windows 11 will support Android apps on PC through the Amazon Appstore. Hence, you can use the same to install the apps on your system. Here’s how:
- Launch the Microsoft Store from the Start menu.

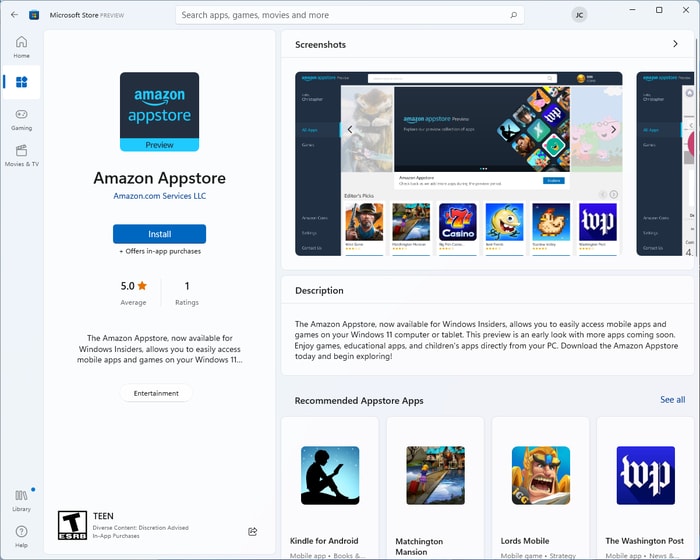
- Search for Amazon Appstore and click on install.
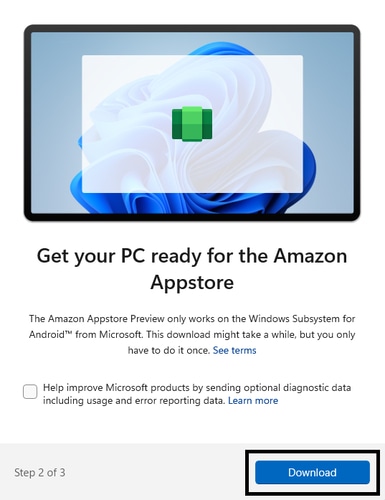
- Follow the on-screen instructions and Download WSA. (Check the boxes required after reading the Terms and Conditions)
- Once downloaded, Set Up an account with Amazon Appstore. (Log in to your existing Appstore account if required.)
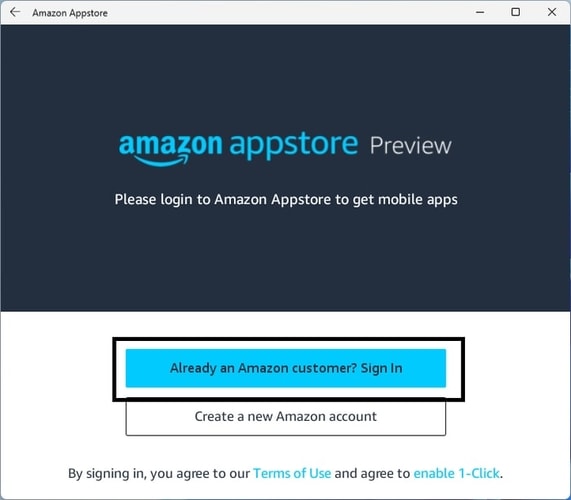
- Launch Amazon Appstore, select the app you like, click on Get and download the app. (Check the box of acceptance if any warning appears.)
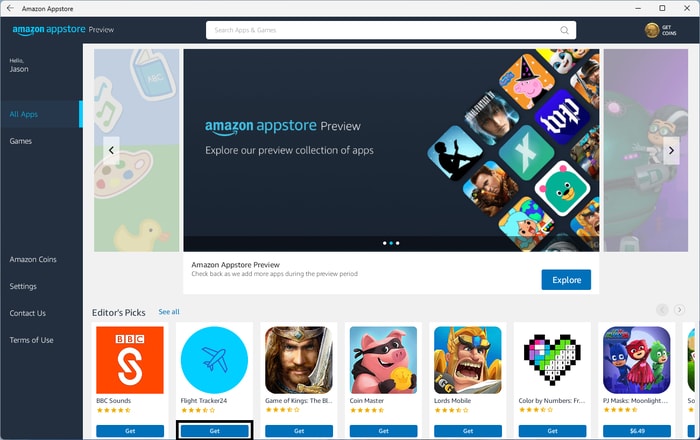
- Once the app is installed, go to the Start menu or the Appstore to launch it.
With the help of these easy steps, you can get running Android apps on PC quite easily. If you want to install some Android APK on Windows 11, then take the help of the next solution.
Also Read: Windows 11 PC Health Check App is Now Available for Everyone
2. How to run APK on Windows 11 through Android Debugging Bridge?
If you want to run android APK on Windows 11, then you need to take the help of Android Debugging Bridge. Below are the easy steps to download the SDK platform tool for Windows and use it to install APKs on your PC:
- Visit the Android developer website.
- Download the SDK Platform-Tools for Windows from the website.
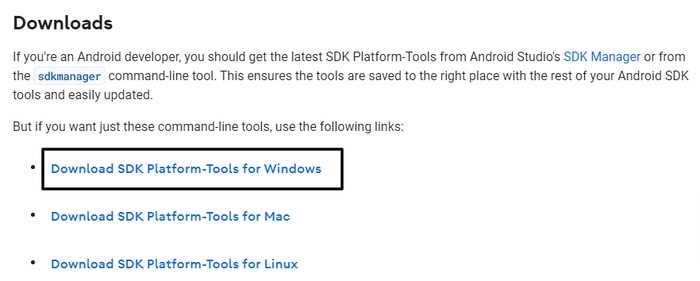
- Scroll down Terms and Conditions, check the box named I have read and agree with the above terms and conditions, and select Download SDK Platform-Tools for Windows.

- Extract the downloaded file to any location.
- Once the extraction is complete, open the folder, copy the path, and paste it elsewhere (Ex. Notes or MS Word).
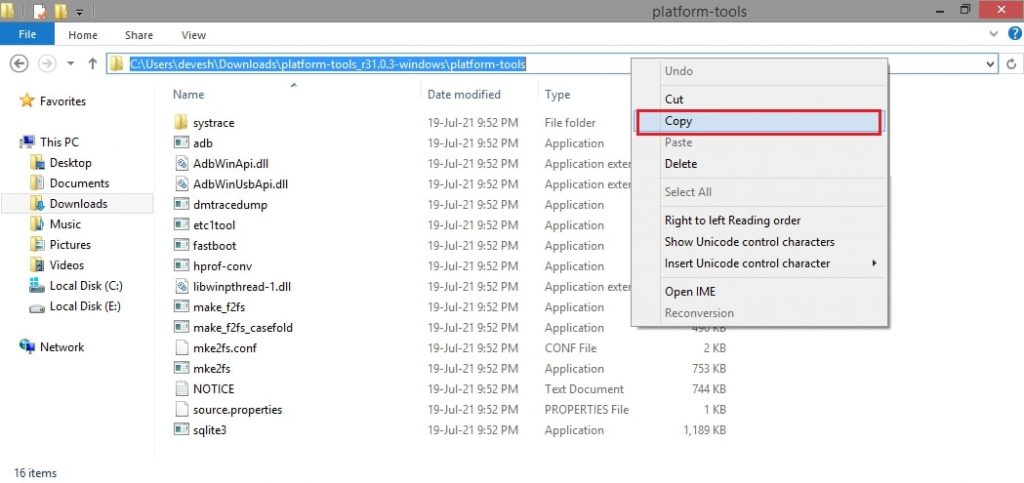
- Now download the required APK for any app you want from trusted sources. (keep the APK in the SDK folder)
- Click on Start, search for Windows Subsystem for Android, and press Enter.
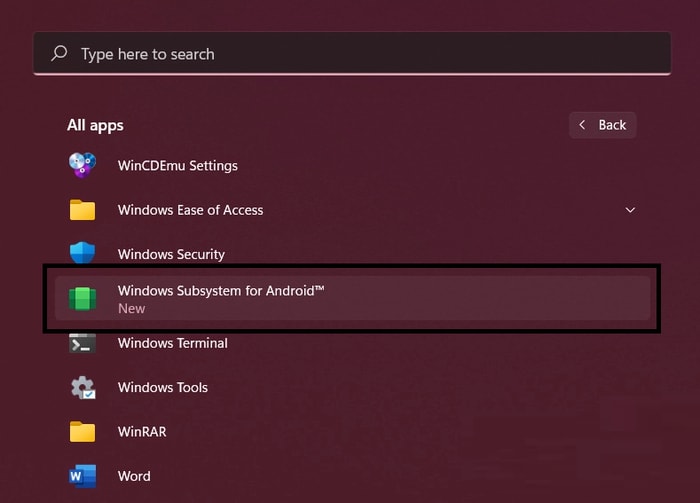
- Toggle on the Developer Mode.
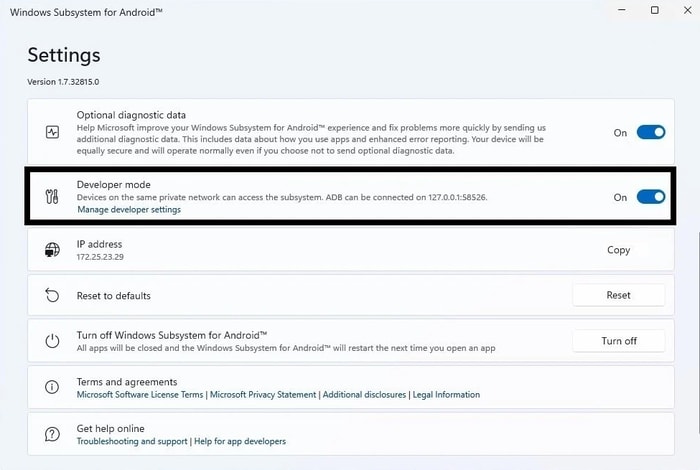
- Now Copy the IP Address and paste it elsewhere (Ex. Notes or MS Word).

- Click on Start, search for cmd, and click on Run as administrator.
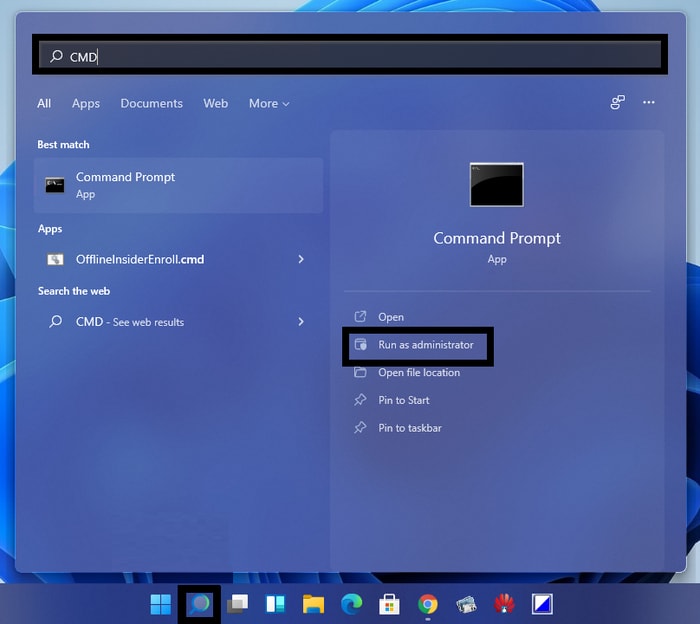
- In Command Prompt, type these commands followed by the Enter key.
Paste the path you copied, ex.C:\Users\yourusername\Downloads\platform-tools_r31.0.3-windows\platform-toolsNow type the IP address followed by the command ex.adb connect 191.87.544.544Now type the apk file you want to install, ex.adb install <APK Path>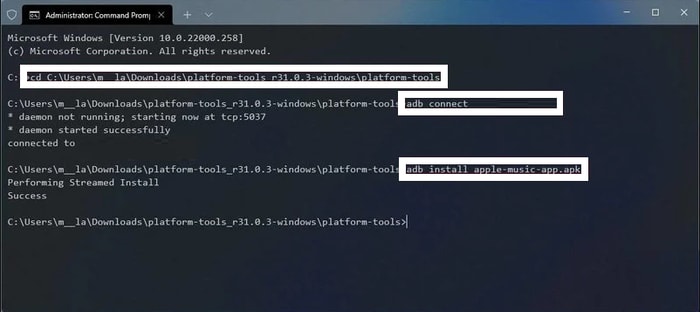
- Once the app is installed, run it like any other app from the Start menu.
So this is how you can use the Android Debugging Bridge to install and open Android apps on PC very easily. You can follow this process to download and install all kinds of gaming and program APKs on the system.
Also Read: How To Fix Internal Microphone is Missing Error on Windows 11 & Older Versions
Successfully Answered How to Install Android Apps on Windows 11
These were some of the easy steps that can help you ascertain how to install Android apps on Windows 11. We have listed two methods to run Android apps on your PC with ease. These are through Amazon Appstore and Android Debugging Bridge. You can take the help of any method as suited.
We recommend that you use the Amazon Appstore to install Android apps on PC if you do not want to apply much effort. You will find all of the major apps on the Appstore to download.
However, if you wish to run android APK on Windows 11, then suggest you use the Android Debugging Bridge. Amazon Appstore is an effective method but does not provide an opportunity to install any PK you want on the system. With the help of SDK Platform-Tools for Windows, you can install the desired app or game on your Windows PC and use it as an Android Device.
If you have any questions related to how to use Google Play apps on Windows 11, then write to us in the comments. For more interesting tech blogs and solutions, subscribe to the newsletter from the Techpout Blog and stay updated.


